How to Use the Blender Brushes for Soft, Seamless Effects
I use Blender Brushes in many of my paintings to smudge and soften paint, creating smooth transitions and an airbrushed effect. They’re especially useful in skies—for example, in my Cumulonimbus Cloud painting, the Blender Brush helped soften the puffs of the clouds, making them look fluffy and natural with no harsh edges.
Because they’re very soft, these brushes leave minimal marks on the surface. By gently sweeping over the paint, they smooth out ridges and bring a beautifully blended finish.

You can watch my video tutorial here
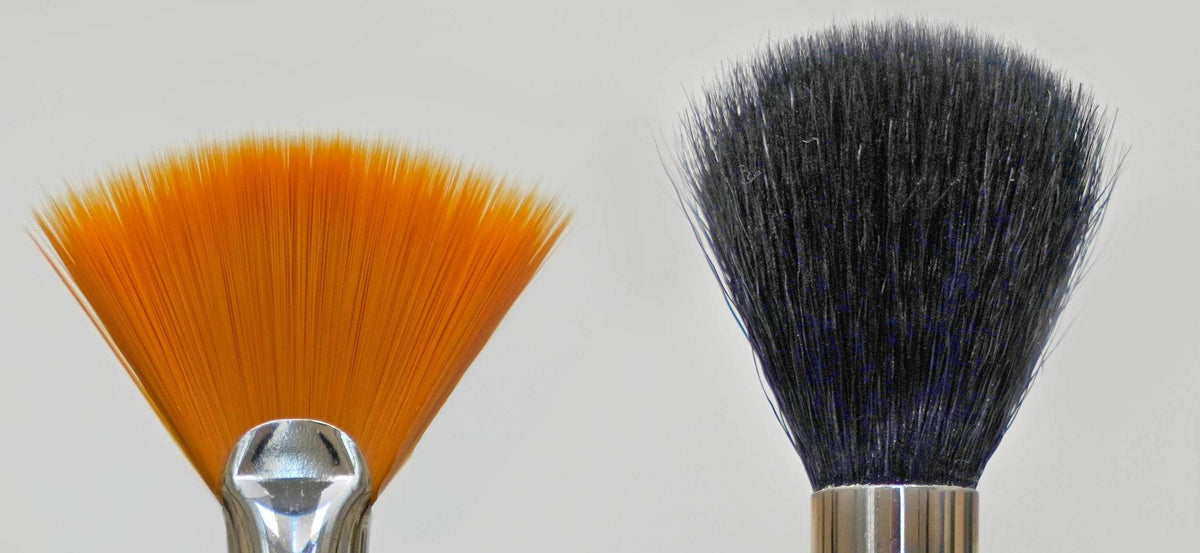
Blender Fan Brush
Technique: Tickle the Surface
The key to mastering the Blender Fan Brush is a light touch:
-
Use only the very edge of the brush.
-
Barely touch the surface, applying the lightest pressure.
-
Gently tickle the paint, smudging and blending it together.
This technique smooths out thicker areas of paint and pulls everything together seamlessly.

The series 8 Blender Fan brush is available to purchase here
Mop Head Blender Brush

The Synthetic Domed Mop Blender is available to purchase here
Creating Soft-Focus Backgrounds
The Blender Brush is also perfect for blurring backgrounds. In my Kingfisher painting, I used it to create a soft-focus backdrop, making the bird’s iridescent colours stand out beautifully.
After roughly applying paint where I want to blend:
-
I start with vertical strokes,
-
Adjust the angle for horizontal and diagonal strokes,
-
Then return to vertical strokes to finish.
Ending with vertical brushstrokes is crucial—horizontal strokes can leave tiny ridges in the paint that catch the light and spoil the smooth look. Vertical strokes give that flawless, airbrushed finish.
Tip: Don’t overwork the area. If you blend too much, you might lift off paint and expose the underlayer. If that happens, simply add more paint and continue blending—it’s easy to fix.
Please Note: The Mop Head Blender Brushes are made with natural fibres, which may shed a small amount of loose hair initially. This is completely normal and simply the excess from the manufacturing process. Shedding will stop after the first few uses and won’t affect the brush’s performance. Before using the brush, we recommend gently rubbing and working through the bristles with your fingers or across a clean cloth. This should remove the majority of the loose fibres before the brush is used on your painting, and the shedding should quickly settle after the first few uses


You can watch my YouTube video below
Keeping Your Blender Brushes Clean
During the process, if the brush starts to feel overloaded with paint, wipe it gently on a paper towel. Avoid cleaning it with thinner or solvent while blending—any moisture on the bristles can leave streaks across the surface. The brush must be completely dry for the best results.

Why Every Artist Should Try It
The Blender Fan Brush is incredibly satisfying to use. Whether you’re softening skies, creating atmospheric depth, or blurring backgrounds, it gives you control over just how much—or how little—you want to blend. From subtle smudges to silky-smooth effects, this brush is a game-changer for adding polish and realism to your paintings.
Alongside the fan, the Mop Brush is another essential tool. With its soft, rounded head, it’s perfect for creating ultra-smooth blends without leaving any visible marks. The Mop is especially useful for large, delicate areas like skies and soft-focus backgrounds, where you want transitions to melt together seamlessly.
Together, the Blender Fan Brush and Mop Brush offer a versatile blending duo—giving you the ability to refine details, soften edges, and achieve that beautiful, airbrushed finish that brings your work to life.
Why don't you give them a try.
Happy painting!